
Create your own Wordpress blog using Azure Websites!

The great Scott Hanselman wrote a blog post early this year which inspired me. That blog post was called Your Blog is The Engine of Community and I suggest that everyone read it. In June, the Azure team at Microsoft released a new feature for their Azure hosted platform called Azure Web Sites. Last Monday the Azure team provided even more awesome additions to the Web Sites feature. So I decided to start my own Azure powered Wordpress blog, and you can too!
So how do we start our own Azure powered blog?
First of all, you need to sign up for Windows Azure. Once that is done you simply enter the Azure Management Portal, click new in the bottom left corner and go through the super simple wizard to create a new Wordpress web site. Once done, your blog should be provisioned in less than a minute. Browse to the URL you gave it during the installation, which should be {yoururl}.azurewebsites.net (don't worry, we can give it our own awesome domain name for a small fee, I'll go over that later), and set up your administrative login and password.
And that's pretty much it. You now have your own blog, running on Azure! Configure it as you please and start blogging!
(Optional): I don't like the {someurl}.azurewebsites.net URL. I want something more fancy!
No problem, but be aware that it will cost you a small amount of money. Setting up your own domain name is very easy.
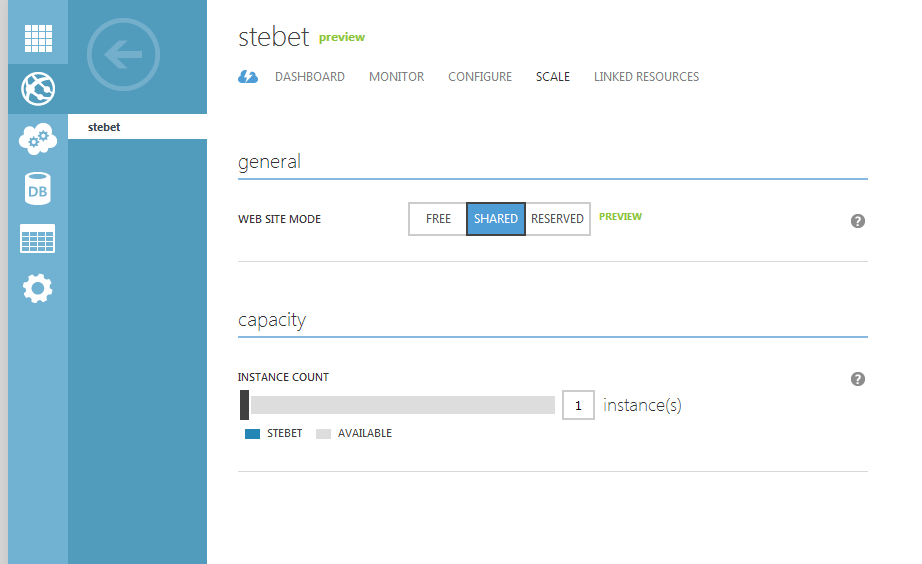
First of all you need to change your Web Site from the Free tier to the Shared or Reserved tier. The Shared tier is NOT FREE, but it's dirt cheap (here is an Azure pricing calculator) and should be more than enough to get you started. To do this simply enter the Azure management portal, select your web site and go to the Scale menu. There click the Shared (or Reserved) Web Site Mode and click Save at the bottom of the portal.
Your web site is now ready to accept your own domain name.
Side note: By signing up with DNSimple through the links below, we both gain an additional 30 days free, through the magic of referral :)
Now it's time to go to your domain registrar of choice (I use DNSimple) and register your domain. Once that is done you need to do a little DNS dance. For the sake of explanation, let's use my domain name, stebet.net, and how I set it up at DNSimple as an example. Your domain registrar should provide you with very similar tools. I want to forward both my naked domain (stebet.net) as well as the www subdomain www.stebet.net to my Azure blog, so the first thing I need to do is set up CNAME entries for both of them so Azure can verify that I actually own the domain.
- For the naked domain, create a CNAME record forwarding awverify.stebet.net to awverify.stebet.azurewebsites.net
- For the www subdomain, create a CNAME record forwarding awverify.www.stebet.net to awverify.stebet.azurewebsites.net

Once this is done, and the DNS records have propagated which might take about an hour in most cases you can go back to the Azure management portal, select your web site and click "Manage Domains" at the bottom of the portal. You should then be able to enter your domain(s) into the list and accept the changes. Make note of the IP address at the bottom of the dialog.
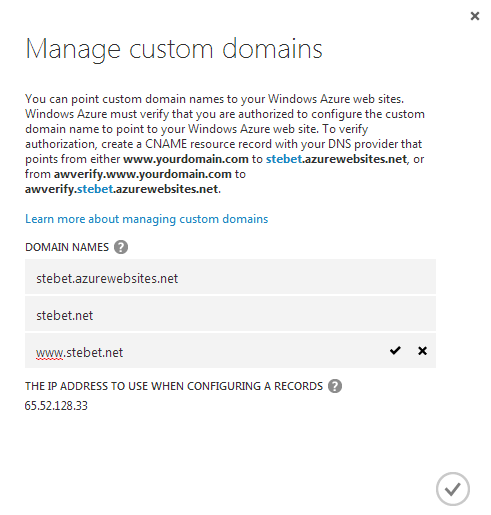
After you have added the domain names to your Azure web site, go back to the DNS configuration for your domain at your domain registrar and add A records pointing the naked domain as well as the www subdomain to that IP address.

VOILA! You now have an awesome Azure powered Wordpress blog with your own domain name!
Now go write your blog posts, be a part of the community and share your knowledge!
Updated: Fixed my silly mistake, forgetting to add the second A record pointing the www subdomain to the IP address.